Your Complete Video Game and Hardware Resource for the Unreal Gamer!
 |
|
|
|
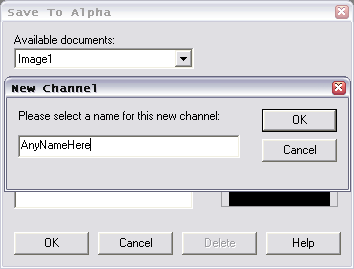
The following article is a user-submitted tutorial on how to make custom crosshairs for UT2004. If you have a tutorial or article you would like to submit please contact me at tycho@unrealops.com Crosshair Tutorial by Kel/Kyllian First off, you need at least the UT2004 3204 patch for the XHair code to work, otherwise, it will just crash after the UT2004 SplashScreen. Secondly, this tutorial is written using PaintShopPro7(PSP). These instructions may or may not work with PhotoShop. Step1: Starting off Start up PSP, then go to File and select New  Step2: Creating a New Image Select the Width/Height/Resolution/Etc What's shown in the image is recommended. Press "OK"  Using either the mousewheel or the Zoom tool, zoom in the image to a larger size(easier to work with than normal 1:1 scale)  Step3: Creating the XHair Here's where you start making the xhair. Using the tools supplied, simply draw it out as you would like. The Draw, Eraser and AirBrush tools will be used most often Because a 64x64 pixel image cannot be centered properly, if you plan on having a center dot in the xhair, you must place pixels at coordinates 31/31, 31/32, 32/31, and 32/32. This will make a 2x2 box that will be properly centered For this tutorial, we'll use a basic Dot design which has a 2x2 white box and a 1 pixel wide border. Image is zoomed to a 4:1 scale(4 times larger than normal). Zooming is not the same as Resizing. The image is not changed at all when zoomed.  Step4: Creating the transparency mask Now that the xhair is created, a mask must be made so that UT2004 will know which areas need to be transparent. To do that you first must go to Masks -> New -> From Image  The "Add Mask From Image" Dialog box will pop up with options for how the mask wil be formed Make sure SourceWindow is set to "This Window" and that the "Source Opaticy" tickbox is checked. "InvertMaskData" should not be checked.  Press "Ok" At this point, you won't notice a change in the image, that is because the Mask is not being shown. Return to Masks, but click the "View Mask" button  Now your image will have a red overlay in any space the XHair is not occupying If it does not look like the picture, something went wrong, delete the mask under Mask -> Delete and try again  Now you have to save the Mask into the image so that it retains it Do so by going to Masks -> Save To Alpha Channel  It will pop up a dialog box titled "Save To Alpha"  Press "Ok" and a new dialog will pop up asking you to name the channel You can name it anything at all, or just click Ok  Your mask in now saved and your image is almost done Step5: Saving your new xhair Go to File -> Save As This will pop up the "Save As" dialog where you will select the FileFormat and Name of your Image Under the "Save As Type" dropdown box, scroll up or down until you see Truevision Targa (*.tga) There are many formats that can be imported into UEd, but *.Tga is the easiest to use.  Next, choose the name and location for it to be saved at and click "Save" At this point, a popup box will appear commenting about certain limitations of the format and if you want to continue. These limitations will not affect the outcome of the save, so click "Yes" and it will be saved as a Tga  SideNote: PSP sometimes has trouble properly doing Masks, which will result in a white outline on any black parts of your xhair. I recommend re-opening it and "over-coloring" the black areas. Meaning, any area that is to be removed by the Mask should be colored black. Next up is creating your Utx, importing the xhair, and writing the code |
or in irc #unrealops on irc.gameradius.org
|
||
|
The Unreal Ops site was created with inspiration from Eyeball-Design. All © content on this site is property of their respective owners. You must contact the Webmaster if you would like to borrow any Unreal Ops Exclusive content on this site. |
||||